|
How to Make a Jersey
|
| rjc_43 |
Posted on 16-10-2008 17:20
|

Team Leader

Posts: 6490
Joined: 13-10-2007
PCM$: 200.00
|
Okay, having spoken to Halvor, and attempted to help him understand how to create a reasonable shirt, I decided to post my help up on the forum, so others can also see what I write.
A couple of things before we start off however. I'm using Adobe Photoshop CS3, and would definately recommend getting it if you want to make some good shirts. I'm not saying you can't make a good shirt without it, but I don't have any experience in that field.
Whatever I write here, is in its entirety how I function, and how I do things. Others may do it another way, or find it easier to do so. This little bit of help isn't to be slated, you may add to it if you like, you may share your ideas, but if you happen to have a problem with what I write, either keep it to yourself, or PM me so we can abuse each other in private.
First off, the layout of Photoshop can be confusing. I know when i started out, i was rather lost on how to do anything! So to keep it simple, here's how my photoshop looks:
The left toolbar, which has all the tools you need to make your first shirt:

If you select one of these tools, the upper bar will change to show the options relating to that tool. So as we can see, I have the "Move Tool" selected, and it shows the relative options:

Opposite the left toolbar, we have what can be simply described as the right navigator/colour selector/layer viewer. Here you can zoom in, move about, choose colours, choose different layers to work on, and many more options.
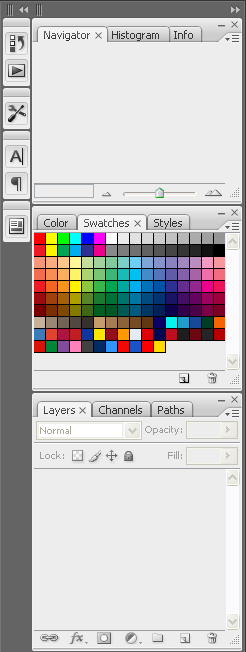
Now that we know what, roughly, is what, we can go about starting a jersey.
Clicking FILE - NEW will bring up this kind of menu:
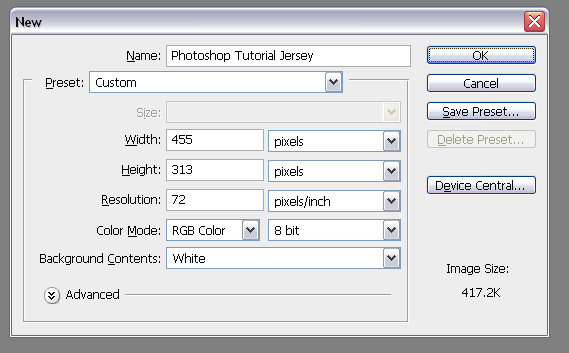
You can input a name here for your file, and make sure that the dimensions are correct. 455 pixels wide, and 313 pixels high are what you need, and everything else you can just keep the same.
Clicking OK loads the new file, and you will have a background layer, probably of white (not that it makes a difference).
To keep it simple, just leave this layer as it is.
Now we need to know which parts of this white space to fill with colour so that the jersey looks right. To do this, we need to add a "plis" or in other words, the jersey's folds. There are plenty in this forum to be had, so find one, save it to your computer and open it up in photoshop.
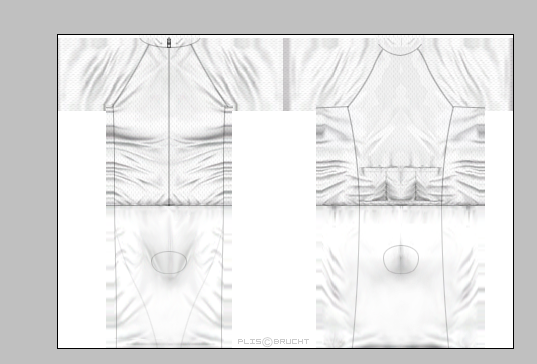
If we now select the second tool down on the LEFT TOOLBAR (called Rectangular Marquee Tool) and click and drag a box over the entire area of the plis, we can copy (ctrl+c or edit - copy) the plis.
Once copied, go to Window and select the first file you made:
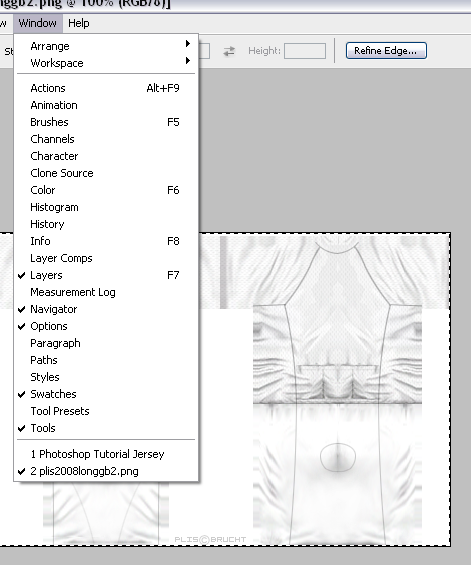
Once there, just paste the plis. (ctrl + v or edit - paste). A new layer will appear over the background layer, with the plis in it.
Select (just left click) on the Background layer, and then click the "new layer" button. This will produce a new layer in between the background and the "plis":
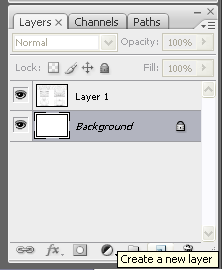
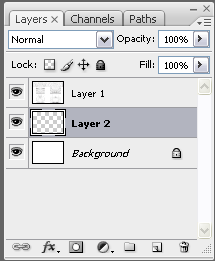
On this layer we can make the shirt have colour!
Reselect the "plis" layer, and change it's blending to "multiply"
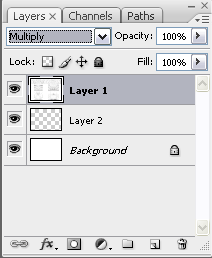
This way, the layers underneath the "plis" layer will show through.
Now you are ready to go back to "layer 2" and add some colour.
I usually choose one main colour I'm going to use, and paint bucket the entire layer:
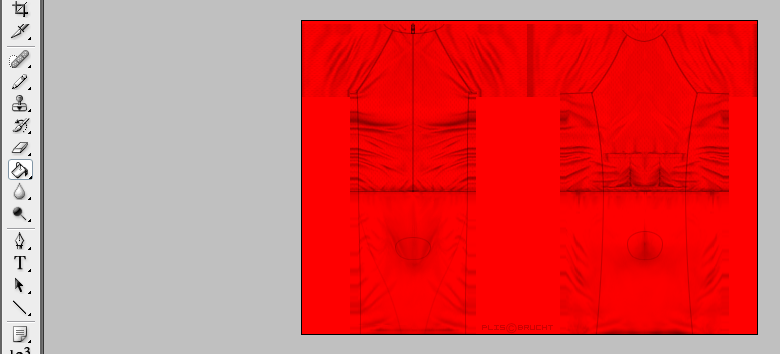
Now you have an extremely basic jersey that you could use in a game.
Save now, and stay tuned for another update on how to:
Add more colours the easy way.
Add sponsors.
Edited by rjc_43 on 02-12-2008 13:16
[url=cleavercycling.co.uk]  [/url] |
| |
|
|
| rjc_43 |
Posted on 16-10-2008 17:57
|

Team Leader

Posts: 6490
Joined: 13-10-2007
PCM$: 200.00
|
To add more colour, the hard option (or could be called - the way I did it!), is to add it in, either in another layer, or on the same one, pixel by pixel, using the paintbrush or pencil. This takes a LONG time, and produces some pixelated work that isn't all that attractive.
The easy way to do it, is to use the "pen".
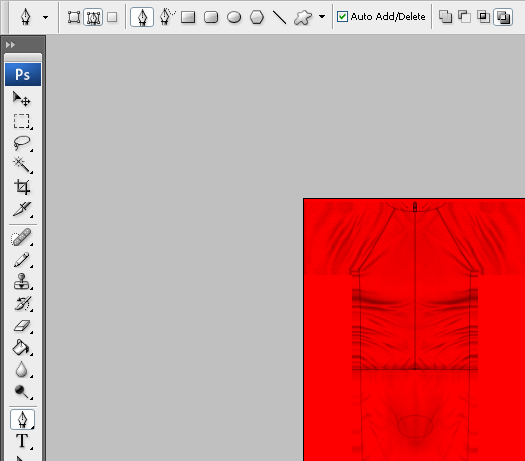
Select the same buttons as are shown in that picture to get the same effects as I get. Or alternatively, use F1 to bring up the photoshop help file to gain a professionals advice!
In this case, I want to draw onto a new layer, so in the same way as before, select layer 2 and click new layer. Layer 3 should appear. Make sure that it is selected so that you are drawing onto that layer, and none other.
When using the pen tool, keep in mind that every left click will produce a new point, and every left click and hold will produce a "curved" point.
For the first example, all I am going to do is add a square shape.
Click 4 points:
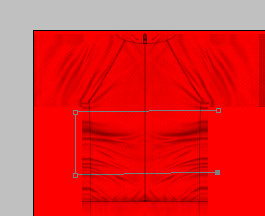
And then finally click on the first point once more to join up the box:
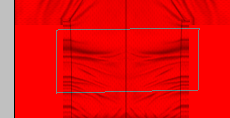
Right clicking near to the pen lines brings up a menu. You can delete the lines if you are not happy with them, or can fill the area with colour by selecting the "fill path..." option.
This gives the option of filling the area with the foreground colour, or the background colour, or any colour, so it is advisable to select the colour you want prior to starting to draw for ease of use. (just select a colour from the right hand area).
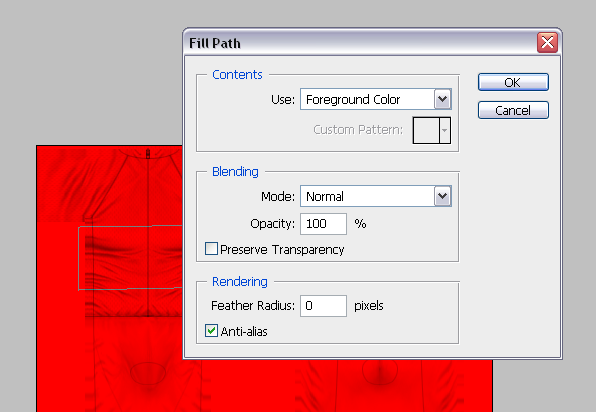
Click OK to fill the path in. Once done, you can now right click again and delete that path.
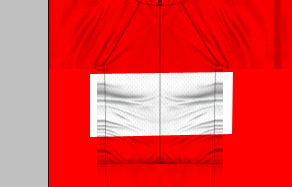
And thats how you do simple shapes.
For more complicated ones, click and hold the left mouse button when selecting corner points, and you can bend the lines to make curves:
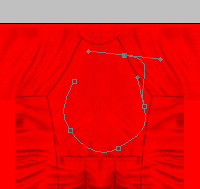
Holding down and dragging out the guiding lines for longer increases the curves. To get a grasp of the idea, its best to play around and gain experience through doing.
Remember to do every new colour addition on a new layer to prevent mistakes becoming irreversible.
Any questions, feel free to ask.
Edited by rjc_43 on 02-12-2008 13:13
[url=cleavercycling.co.uk]  [/url] |
| |
|
|
| Ad Bot |
Posted on 11-12-2025 07:23
|
Bot Agent
Posts: Countless
Joined: 23.11.09
|
|
| IP: None |
|
|
| JMURB |
Posted on 16-10-2008 18:19
|
Under 23

Posts: 54
Joined: 01-12-2006
PCM$: 200.00
|
Nice Tutorial  |
| |
|
|
| wackojackohighcliffe |
Posted on 16-10-2008 18:55
|

Team Leader

Posts: 7366
Joined: 19-02-2008
PCM$: 200.00
|
can you give a guide to size of sponsors and how to make more complicated designs?
also, is this the same for stuff like paint.net
|
| |
|
|
| rjc_43 |
Posted on 16-10-2008 18:58
|

Team Leader

Posts: 6490
Joined: 13-10-2007
PCM$: 200.00
|
wackojackohighcliffe wrote:
can you give a guide to size of sponsors and how to make more complicated designs?
also, is this the same for stuff like paint.net
rjc_43 wrote:
A couple of things before we start off however. I'm using Adobe Photoshop CS3, and would definately recommend getting it if you want to make some good shirts. I'm not saying you can't make a good shirt without it, but I don't have any experience in that field.
... and stay tuned for another update on how to:
Add more colours the easy way.
Add sponsors.
[url=cleavercycling.co.uk]  [/url] |
| |
|
|
| wackojackohighcliffe |
Posted on 16-10-2008 19:12
|

Team Leader

Posts: 7366
Joined: 19-02-2008
PCM$: 200.00
|
my bad
|
| |
|
|
| p3druh |
Posted on 16-10-2008 19:17
|

Small Tour Specialist

Posts: 2388
Joined: 28-09-2007
PCM$: 200.00
|
Are there any huge differences between Photoshop CS2 and CS3?
|
| |
|
|
| rjc_43 |
Posted on 16-10-2008 19:45
|

Team Leader

Posts: 6490
Joined: 13-10-2007
PCM$: 200.00
|
Im guessing the tools are the same, I presume it's like most programmes where they just upgrade little bits here and there. As far as I'm aware, I first used Photoshop about 7 years ago and it still has most of the same tools since then.
[url=cleavercycling.co.uk]  [/url] |
| |
|
|
| t-baum |
Posted on 16-10-2008 19:59
|

Small Tour Specialist

Posts: 2006
Joined: 07-09-2007
PCM$: 200.00
|
p3druh wrote:
Are there any huge differences between Photoshop CS2 and CS3?
Short answer:no.
just everything will look a bit different, but it will work the same.
And thanks for the guide, i knew how to make jerseys but the bit at the end with the pen tool was good, i never could work that damn tool 
 Macquet wrote:
"We all know that wasn't the real footage of the Worlds anyway. That was just the staged footage to perpetuate the coverup that it was actually Vinokourov that won the race." |
| |
|
|
| CrueTrue |
Posted on 17-10-2008 08:27
|

Tour de France Champion

Posts: 27880
Joined: 20-10-2006
PCM$: 200.00
|
Well done, rjc. Much appreciated. |
| |
|
|
| fenian_1234 |
Posted on 17-10-2008 12:40
|
Grand Tour Specialist

Posts: 4726
Joined: 06-12-2006
PCM$: 200.00
|
Nice one.
Should be put in the articles section, I think, Crue.  |
| |
|
|
| thex |
Posted on 17-10-2008 13:22
|

Under 23

Posts: 93
Joined: 26-11-2007
PCM$: 200.00
|
Can i see the jerseys i created in the cyclist viewer? Because everytime i want to load it it crashes
or is there another possibility to look how the jerseys appear before i play the game?
I am the king.
|
| |
|
|
| rjc_43 |
Posted on 17-10-2008 13:26
|

Team Leader

Posts: 6490
Joined: 13-10-2007
PCM$: 200.00
|
Erm, the way i do it, is to save the .tga file (in 32bit) as the csc_maillot.tga, and load that up. Other than that, I do not know why the viewer would crash.
[url=cleavercycling.co.uk]  [/url] |
| |
|
|
| thex |
Posted on 17-10-2008 13:30
|

Under 23

Posts: 93
Joined: 26-11-2007
PCM$: 200.00
|
what do you mean when you say you load that up? i am completely new to the cyclist viewer and the only thing i foud out is i can start the .exe and the viewer starts and i see a quick step rider 
I am the king.
|
| |
|
|
| rjc_43 |
Posted on 17-10-2008 13:40
|

Team Leader

Posts: 6490
Joined: 13-10-2007
PCM$: 200.00
|
First off, download PCM Viewer if you haven't already.
https://pcmdaily.com/infusions/pro_dow...hp?did=418
When you open the viewer, you will see something like this:
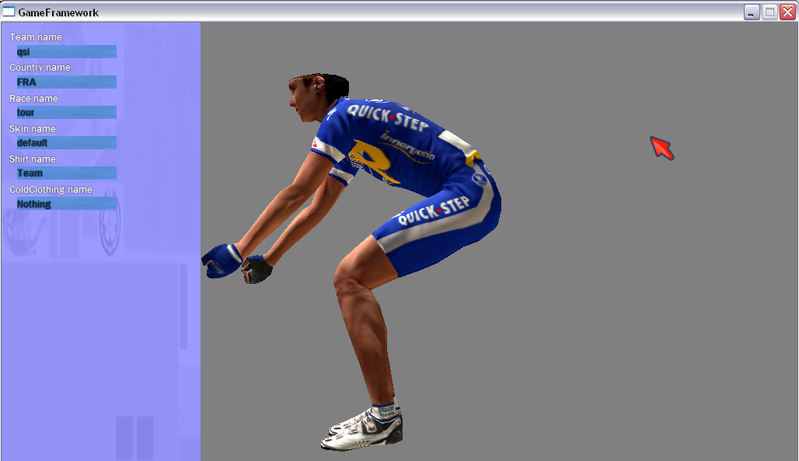
In the top left box, where it says qsi:
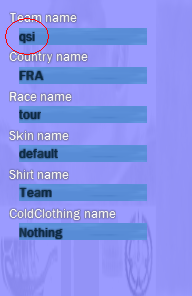
You can delete those 3 letters and put in another team's prefix to see that team IF the team has a folder and a shirt in that folder in the same place as the viewer is in.
For example, i have my viewer folder in My Documents/Graphics/PCM08/PCMViewer/
The shirts, if i want to see them I put in My Documents/Graphics/PCM08/PCMViewer/cm_textures/cycliste/team/csc/
and then i overwrite the csc shirt there with whatever shirt i want to see.
Go back to the viewer and type in csc in the top left box, press return, and hey presto, you get to see your creation.
To see equipment, or extras, such as leg warmers, arm warmers, shoes, socks, etc. They need to be placed in the same location as the jersey and named correctly. So to take the example of using "qsi" as the prefix, if i wanted to see leg warmers:
qsi_jambieres.tga
I hope you get the idea...
Leg warmers = _jambieres
Helmet = _casque
Gloves = _gants
Bottle = _bidon
Arm warmers = _manchettes
Shoes = _shoes
Socks = _socquettes
Edited by rjc_43 on 02-12-2008 13:13
[url=cleavercycling.co.uk]  [/url] |
| |
|
|
| rodda |
Posted on 17-10-2008 13:41
|

Sprinter

Posts: 1903
Joined: 17-08-2007
PCM$: 200.00
|
for those asking about paint.net, a lot of the stuff is similar, ie you can use the layering technique and so on, although the other tools have different names, there a fewer, and they are in different places of course
|
| |
|
|
| thex |
Posted on 17-10-2008 14:09
|

Under 23

Posts: 93
Joined: 26-11-2007
PCM$: 200.00
|
wow it works thank you for the great explanation
maybe i was just to stupid for it 
I am the king.
|
| |
|
|
| rjc_43 |
Posted on 17-10-2008 14:11
|

Team Leader

Posts: 6490
Joined: 13-10-2007
PCM$: 200.00
|
That was just what I'd sent Halvor, so yeah, everyone might as well get the benefit 
[url=cleavercycling.co.uk]  [/url] |
| |
|
|
| thex |
Posted on 17-10-2008 14:25
|

Under 23

Posts: 93
Joined: 26-11-2007
PCM$: 200.00
|
i have another question or maybe a request
do you have a background or layer for a trakc jersey too?
I am the king.
|
| |
|
|
| rjc_43 |
Posted on 17-10-2008 15:19
|

Team Leader

Posts: 6490
Joined: 13-10-2007
PCM$: 200.00
|
Check out the template thread:
https://pcmdaily.com/forum/viewthread....ost_119079
[url=cleavercycling.co.uk]  [/url] |
| |
|


